Tutorial
Git 05: Git Add Changes - Commit
Last Updated: Apr 8, 2021
This tutorial reviews how to add and commit changes to a Git repo.
- Add new files or changes to existing files to your repo.
- Document changes using the
commitcommand with a message describing what has changed. - Describe the difference between
git addandgit commit. - Sync changes to your local repository with the repostored on GitHub.com.
- Use and interpret the output from the following commands:
-
git status -
git add -
git commit -
git push
-
Additional Resources
- -- this diagram includes more commands than we will learn in this series but includes all that we use for our standard workflow.
- -- we do not focus on the use of branches in Git or GitHub, however, if you want more information on this structure, this Git documentation may be of use.
In the previous lesson, we created a markdown (.md) file in our forked version
of the DI-NEON-participants central repo. In order for Git to recognize this
new file and track it, we need to:
- Add the file to the repository using
git add. - Commit the file to the repository as a set of changes to the repo (in this case, a new
document with some text content) using
git commit. - Push or sync the changes we've made locally with our forked repo hosted on github.com
using
git push.
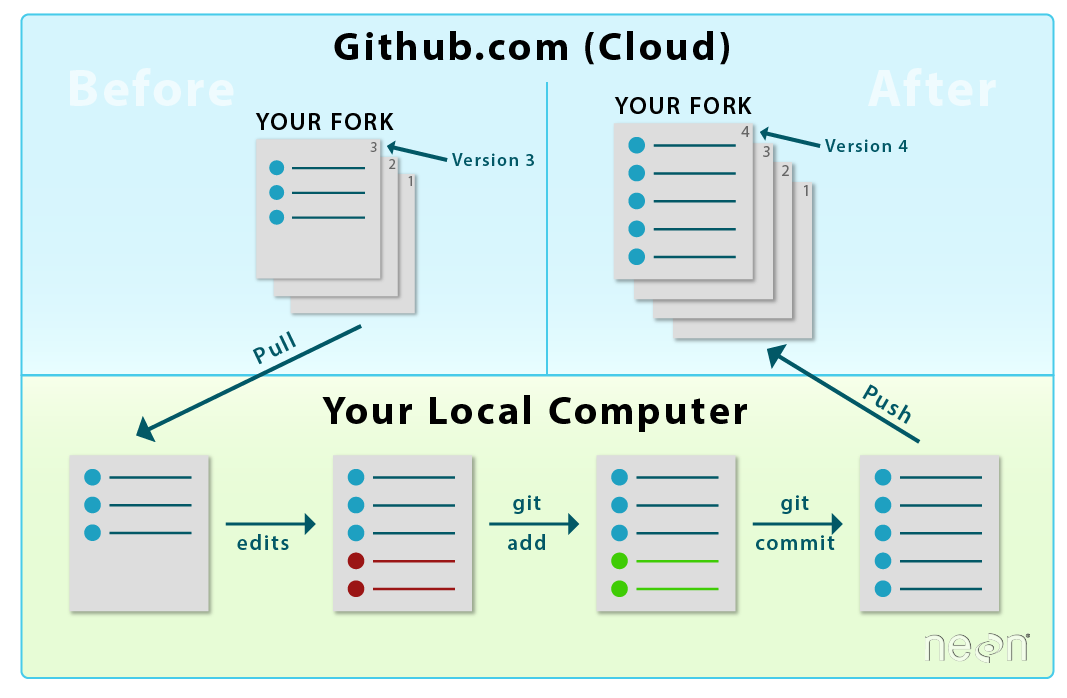
git pull to pull changes in your
fork on github.com down to your computer to ensure both repos are in sync.
Edits to a file on your computer are not recognized by Git until you
"add" and "commit" them as tracked changes in your repo.
Source: National Ecological Observatory Network (NEON)
Check Repository Status -- git status
Let's first run through some basic commands to get going with Git at the command line. First, it's always a good idea to check the status of your repository. This allows us to see any changes that have occurred.
Do the following:
- Open bash if it's not already open.
- Navigate to the
DI-NEON-participantsrepository in bash. - Type:
git status.
The commands that you type into bash should look like the code below:
# Change directory
# The directory containing the git repo that you wish to work in.
$ cd ~/Documents/GitHub/neon-data-repository-2016

# check the status of the repo
$ git status
Output:
On branch master
Your branch is up-to-date with 'origin/master'.
Changes not staged for commit:
 (use "git add <file>..." to update what will be committed)
 (use "git checkout -- <file>..." to discard changes in working directory)

Untracked files:
 (use "git add <file>..." to include in what will be committed)

_posts/ExampleFile.md
Let's make sense of the output of the git status command.
-
On branch master: This tells us that we are on the master branch of the repo. Don't worry too much about branches just yet. We will work on the master branch throughout the Data Institute. -
Changes not staged for commit:This lists any file(s) that is/are currently being tracked by Git but have new changes that need to be added for Git to track. -
Untracked file:These are all new files that have never been added to or tracked by Git.
Use git status anytime to view any untracked changes that have occurred, what
is being tracked and what is not currently being tracked.
Add a File - git add
Next, let's add the Markdown file containing our bio and short project summary
using the command git add FileName.md. Replace FileName.md with the name
of your markdown file.
# add a file, so that changes are tracked
$ git add ExampleBioFile.md

# check status again
$ git status

On branch master
Your branch is up-to-date with 'origin/master'.
Changes to be committed:
 (use "git reset HEAD <file>..." to unstage)

	new file:  _posts/ExampleBioFile.md
Understand the output:
-
Changes to be committed:This lists the new files or files with changes that have been added to the Git tracking system but need to be committed as actual changes in the git repository history.
Commit Changes - git commit
When we add a file in the command line, we are telling Git to recognize that
a change has occurred. The file moves to a "staging" area where Git
recognizes a change has happened but the change has not yet been formally
documented. When we want to permanently document those changes, we
commit the change. A single commit will work for all files that are currently
added to and in the Git staging area (anything in green when we check the status).
Commit Messages
When we commit a change to the Git version control system, we need to add a commit message. This message describes the changes made in the commit. This commit message is helpful to us when we review commit history to see what has changed over time and when those changes occurred. Be sure that your message covers the change.
# commit changes with message
$ git commit -m “new example file for demonstration�
[master e3cd622] new example file for demonstration
1 file changed, 56 insertions(+), 4 deletions(-)
create mode 100644 _posts/ExampleFile.md
Understand the output: Each commit will look slightly different but the important parts include:
-
master xxxxxxxthis is the unique identifier for this set of changes or this commit. You will always be able to track this specific commit (this specific set of changes) using this identifier. -
_ file change, _ insertions(+), _ deletion (-)this tells us how many files have changed and the number of type of changes made to the files including: insertions, and deletions.
Why Add, then Commit?

git add specifies what will go in a snapshot (putting things
in the staging area), and git commit then actually takes the snapshot and
makes a permanent record of it (as a commit). Image and caption source:
To understand what is going on with git add and git commit it is important
to understand that Git has a staging area that we add items to with git add.
Changes are not actually documented and permanently tracked until we commit them. This allows
us to commit specific groups of files at the same time if we wish. For instance,
we may decide to add and commit all R scripts together. And Markdown files in another,
separate commit.
Transfer Changes (Commits) from a Local Repo to a GitHub Repo - git push
When we are done editing our files and have committed the changes locally, we
are ready to transfer or sync these changes to our forked repo on github.com. To
do this we need to push our changes from the local Git version control to the
remote GitHub repo.
To sync local changes with github.com, we can do the following:
- Check the status of our repo using
git status. Are all of the changes added and committed to the repo? - Use
git push origin master.origintells Git to push the files to the originating repo which in this case - is our fork on github.com which we originally cloned to our local computer.masteris the repo branch that you are currently working on.
Let's push the changes that we made to the local version of our Git repo to our fork, in our github.com account.
# check the repo status
$ git status

On branch master
Your branch is ahead of 'origin/master' by 1 commit.
  (use "git push" to publish your local commits)

# transfer committed changes to the forked repo
git push origin master

Counting objects: 1, done.
Delta compression using up to 4 threads.
Compressing objects: 100% (6/6), done.
Writing objects: 100% (6/6), 1.51 KiB | 0 bytes/s, done.
Total 6 (delta 4), reused 0 (delta 0)
To https://github.com/mjones01/DI-NEON-participants.git
   5022aca..e3cd622  master -> master
NOTE: You may be asked for your username and password! This is your github.com username and password.
Understand the output:
- Pay attention to the repository URL - the "origin" is the
repository that the commit was pushed to, here
https://github.com/mjones01/DI-NEON-participants.git. Note that because this repo is a fork, your URL will have your GitHub username in it instead of "mjones01".
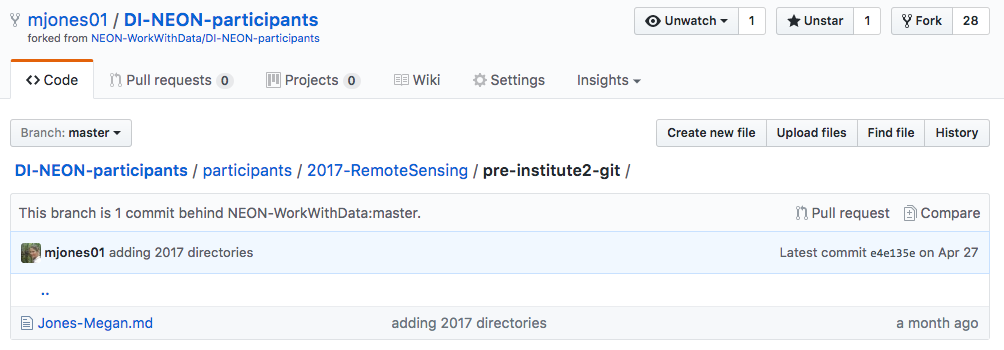
View Commits in GitHub
Let’s view our recent commit in our forked repo on GitHub.
- Go to github.com and navigate to your forked Data Institute repo - DI-NEON-participants.
- Click on the commits link at the top of the page.
- Look at the commits - do you see your recent commit message that you typed into bash on your computer?
- Next, click on the <>CODE link which is ABOVE the commits link in github.
- Is the Markdown file that you added and committed locally at the command line on your computer, there in the same directory (participants/pre-institute2-git) that you saved it on your laptop?
Is Your File in the NEON Central Repo Yet?
Next, do the following:
- Navigate to the NEON central repo. (The easiest method to do this is to click the link at the top of the page under your repo name).
- Look for your file in the same directory. Is your new file there? If not, why?
Remember the structure of our workflow.
We’ve added changes from our local repo on our computer and pushed them to our fork on github.com. But this fork is in our individual user account, not NEONS. This fork is separate from the central repo. Changes to a fork in our github.com account do not automatically transfer to the central repo. We need to sync them! We will learn how to sync these two repos in the next tutorial Git 06: Syncing GitHub Repos with Pull Requests .
Summary Workflow - Committing Changes
On your computer, within your local copy of the Git repo:
- Create a new markdown file and edit it in your favorite text editor.
On your computer, in shell (at the command line):
-
git status -
git add FileName -
git status- make sure everything is added and ready for commit - `git commit -m “messageHere�
-
git push origin master
On the github.com website:
- Check to make sure commit is added.
- Check to see if the file that you added is visible online in your Git repo.
Have questions? No problem. Leave your question in the comment box below. It's likely some of your colleagues have the same question, too! And also likely someone else knows the answer.